29 November 2025
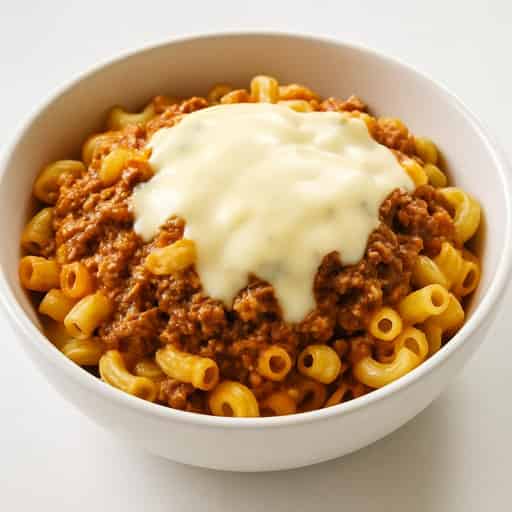
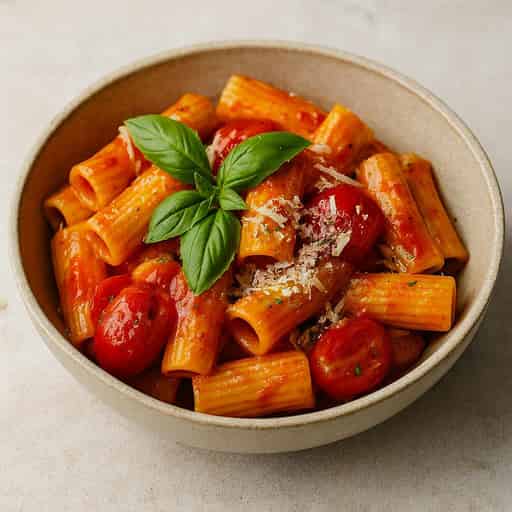
Cheese-Pull Merienda Mac & Cheese Bake
RecipeShare Test Kitchen

Ultra-creamy baked macaroni and cheese with a simple white sauce and loads of melty cheese—an easy, budget-friendly Filipino-style merienda.
Cheese-Pull Merienda Mac & Cheese Bake
Looking for a cheesy, comforting, and budget-friendly merienda? This Filipino-style baked mac and cheese delivers big flavour and maximum cheese pulls using pantry staples. It's rich, ultra-creamy, and topped with a bubbly golden cheese crust—perfect for kids, potlucks, or even baon.
🍝 Why You’ll Love This Recipe
- Simple Ingredients – You only need elbow macaroni, milk, flour, butter, and your favourite melting cheese.
- Big Cheese Pull Energy – Sliced cheese topping gives that satisfying cheesy stretch.
- Perfect for Sharing – Bake it in one large dish or divide into mini foil containers for baon or parties.
- Make-Ahead Friendly – Assemble in advance, refrigerate, and bake when needed.
🧀 Key Ingredients
- Elbow Macaroni – The classic shape for holding onto all that luscious cheese sauce.
- Processed Cheese – Filipino-style cheese blocks melt smoothly and give that signature cheesy flavour.
- Milk + Roux Base – A simple béchamel sauce brings the whole thing together.
🥄 Step-by-Step Instructions
1. Cook the Macaroni
Boil salted water, cook macaroni until just al dente, then drain and set aside.
2. Make the Cheese Sauce
In a saucepan, melt butter and whisk in flour to form a roux. Gradually add milk, stirring constantly until thickened. Off the heat, stir in cheese cubes until fully melted and season with salt and pepper.
3. Combine and Assemble
Toss cooked macaroni in the cheese sauce until well coated. Pour into a greased baking dish and top with cheese slices.
4. Bake and Serve
Bake in a preheated oven at 200°C (180°C fan) / 400°F for 12–15 minutes until bubbly and golden. Rest briefly before serving, and garnish with chopped spring onions or parsley.
👩🍳 Tips for Success
- Salt your pasta water generously—it’s your first layer of seasoning.
- Don’t overcook the macaroni; it’ll cook a bit more in the oven.
- Add hotdogs, shredded chicken, or bacon for extra flavour and texture.
- Use a mix of cheddar and mozzarella for a more natural cheese option.
❓ FAQ
Can I use another cheese?
Yes! Try mozzarella and mild cheddar for a natural melt, just watch the salt content.
Can I make this ahead?
Absolutely. Assemble it up to a day in advance, refrigerate, and bake just before serving—add a few extra minutes in the oven.
🍽️ Serving Suggestions
Pair it with fried chicken, garlic bread, or a light salad. For baon, portion into individual foil containers and reheat in the oven or toaster for best results.
🧡 Real Feedback
“Tried this for Sunday merienda and my kids scraped the dish clean. Super simple but lasang bongga!” — Mae C.
“Love how creamy the sauce is with just a few ingredients. Next time I’ll add hotdogs for a more Pinoy feel.” — Rowena P.
“Perfect baon idea! I baked it in small foil containers and my family reheated them in the toaster. Still so cheesy.” — Jay M.
Enjoy this cheesy merienda classic and tag us if you share it online! #CheesePullMacBake
Cheese-Pull Merienda Mac & Cheese Bake
RecipeShare Test KitchenUltra-creamy baked macaroni and cheese with a simple white sauce and loads of melty cheese—an easy, budget-friendly Filipino-style merienda.

Chef's Tips
Salt the pasta water well so the macaroni is flavourful before it even hits the sauce.
Turn off the heat before adding the cheese cubes so the sauce stays smooth and doesn’t become grainy.
Bake just until the top is golden and bubbling to avoid drying out the pasta.
You can assemble the dish ahead, chill, then bake just before serving for freshly baked merienda.
Tools Used
Saucepan(opens in a new tab)Whisk(opens in a new tab)Wooden SpoonMeasuring CupsMeasuring SpoonsKnife(opens in a new tab)Chopping Board(opens in a new tab)Colander(opens in a new tab)Oven
We use affiliate links, which may earn us a small commission at no extra cost to you.
Ingredients
USMetric
Macaroni Base
Cheese Sauce
Cheesy Topping
Optional Garnish
Instructions
Cook the Macaroni
- 1
Bring a large pot of water to a boil, add the salt, then stir in the elbow macaroni.
- 2
Cook the pasta according to the packet instructions until just al dente.
- 3
Drain the macaroni well and set aside while you prepare the sauce.
Make the Cheese Sauce
- 1
In a medium saucepan over low–medium heat, melt the butter.
- 2
Sprinkle in the flour and whisk constantly for 1–2 minutes to form a smooth paste (roux) without browning it.
- 3
Slowly pour in the milk while whisking, making sure there are no lumps.
- 4
Continue cooking, stirring regularly, until the sauce bubbles and thickens enough to coat the back of a spoon.
- 5
Turn off the heat, then add the cheese cubes. Stir until the cheese is completely melted and the sauce is smooth and creamy.
- 6
Season the sauce with salt and black pepper to taste.
Combine and Assemble
- 1
Add the drained elbow macaroni to the pot of cheese sauce.
- 2
Fold gently until every piece of pasta is evenly coated and the mixture looks creamy and glossy.
- 3
Transfer the mac and cheese into a lightly greased oven-safe baking dish and spread it into an even layer.
- 4
Arrange the sliced processed cheese over the top, covering as much of the surface as possible for a full cheese crust.
Bake and Serve
- 1
Preheat the oven to 200°C (180°C fan) / 400°F.
- 2
Bake the mac and cheese for 12–15 minutes, or until the cheese on top is melted, bubbling, and golden in spots.
- 3
Remove from the oven and let it sit for 5 minutes so it sets slightly and is easier to scoop.
- 4
Sprinkle with chopped spring onions or parsley if using, then serve hot with those irresistible cheese pulls.
Save, Plan & Shop Smarter
Create and edit your own recipes, import from most websites, plan your week, and build smart grocery lists.
Import recipes from most websites
Create and edit your own recipes
Plan your week with the Meal Planner
Mark favourites for quick access
Build grocery lists from your meal plan
Tick off pantry items you already have
Nutrition Facts
Serving Size: 1 portion (about 200g)
Calories 480
% Daily Value*
Total Fat 26g33%
Saturated Fat 10g50%
Trans Fat 0g
Cholesterol 80mg27%
Sodium 780mg34%
Total Carbohydrates 40g15%
Dietary Fiber 1g4%
Sugars 6g
Protein 20g
* Percent Daily Values are based on a 2,000 calorie diet. Your daily values may be higher or lower depending on your calorie needs.
Create your own recipe
Add your personal creations and build your own recipe collection.
Loading...